
My newsletter Le Courrier du hacker (3,800 subscribers, 176 issues) is 3 years old and Mailchimp costs were becoming unbearable for a small project ($50 a month, $600 a year), with still limited revenues nowadays. Switching to the Open Source Mailtrain plugged to the AWS Simple Email Service (SES) will dramatically reduce the associated costs.
First things first, thanks a lot to Pierre-Gilles Leymarie for his own article about switching to Mailtrain/SES. I owe him (and soon you too) so much. This article will be a step-by-step about how to set up Mailtrain/SES on a dedicated server running Linux.
What’s the purpose of this article?
Mailchimp is more and more expensive following the growth of your newsletter subscribers and you need to leave it. You can use Mailtrain, a web app running on your own server and use the AWS SES service to send emails in an efficient way, avoiding to be flagged as a spammer by the other SMTP servers (very very common, you can try but… you have been warned against 😉
Prerequisites
You will need the following prerequisites :
- An AWS account with admin rights
- Full control over the domain name you use to send your newsletter
- A baremetal or virtual Linux Debian server you have the root access to
- NodeJS installed (8x and 10x are ok with Mailtrain)
- A MySQL/MariaDB instance with the root access to
- Redis 3x (not 5) if you want to use Redis (not mandatory)
Steps
This is a fairly straightforward setup if you know what you’re doing. In the other case, you may need the help of a professional sysadmin.
You will need to complete the following steps in order to complete your setup:
- Configure AWS SES
- Configure your server by:
- configuring your database
- install Mailtrain
- configuring your web server
- Configure your Mailtrain setup
Configure AWS SES
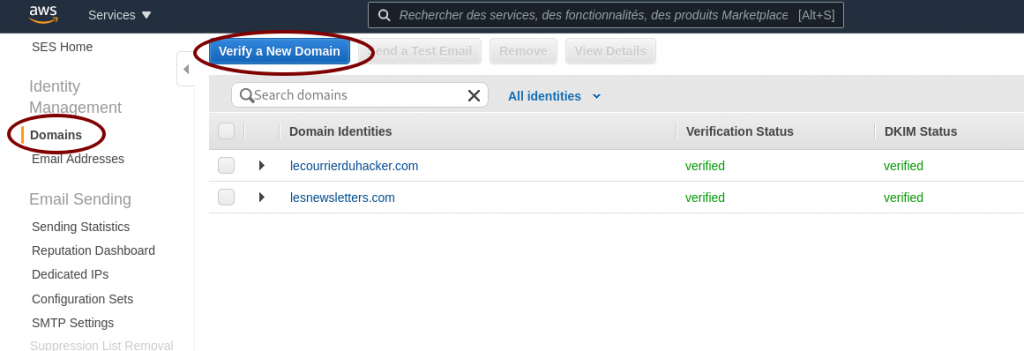
Verify your domain
You need to configure the DKIM to certify that the emails sent are indeed from your own domain. DKIM is mandatory, it’s the de-facto standard in the mail industry.
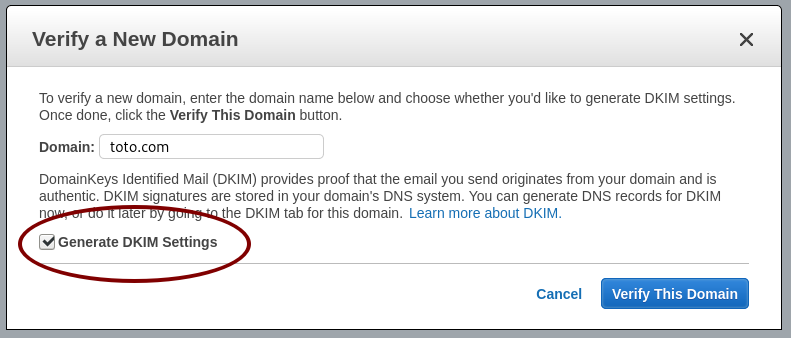
Ask to verify your domain
Generate the DKIM settings
Use the DKIM settings
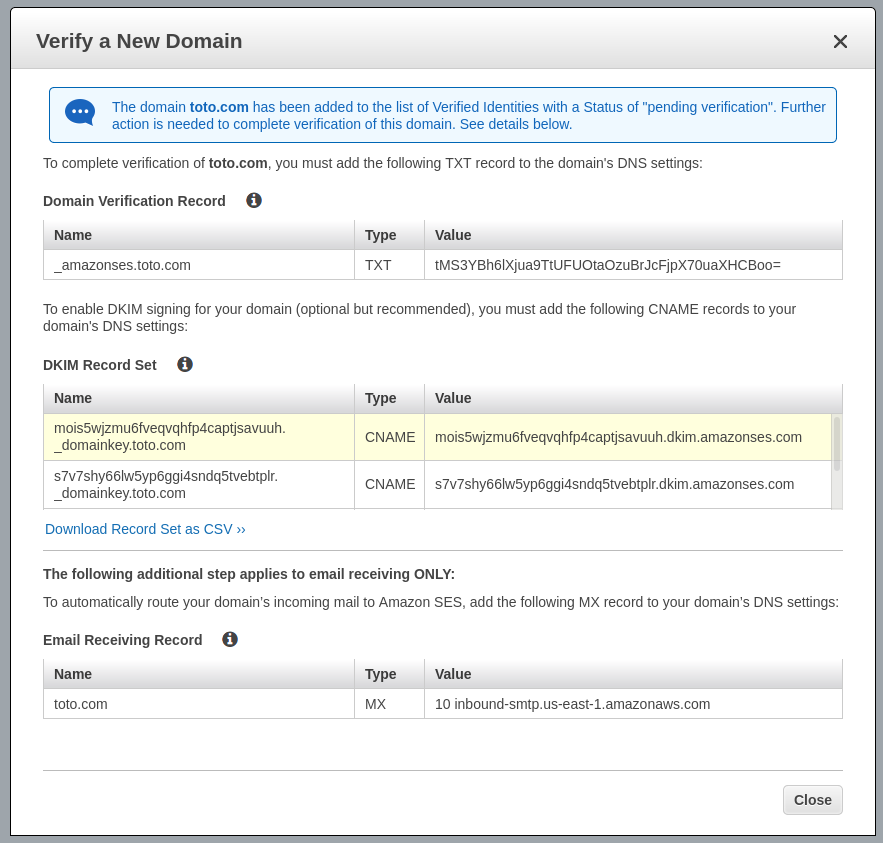
Now you have your DKIM settings and Amazon AWS is waiting for finding the TXT field in your DNS zone.
Configure your DNS zone to include DKIM settings
I can’t be too specific for this section because it varies A LOT depending on your DNS provider. The keys is: as indicated by the previous image you have to create one TXT record and two CNAME records in your DNS zone. The names, the types and the values are indicated by AWS SES.
If you don’t understand what’s going here, there is a high probabiliy you’ll need a system administrator to apply these modifications and the next ones in this article.
Am I okay for AWS SES ?
As long as the word verified does not appear for your domain, as shown in the image below, something is wrong. Don’t wait too long, you have a misconfiguration somewhere.
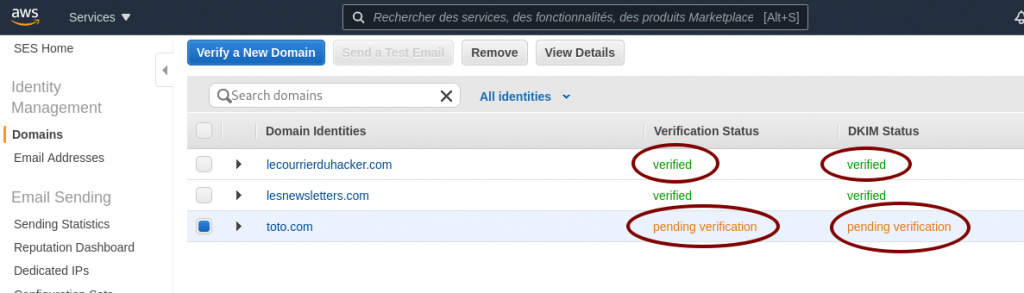
When your domain is verified, you’ll also receive an email to inform you about the successful verification.
SMTP settings
The last step is generating your credentials to use the AWS SES SMTP server. IT is really straightforward, providing the STMP address to use, the port, and a pair of username/password credentials.

Just click on Create My SMTP Credentials and follow the instructions. Write the SMTP server address somewhere and store the file with credentials on your computer, we’ll need them below.
Configure your server
As we said before, we need a baremetal server or a virtual machine running a recent Linux.
Configure your MySQL/MariaDB database
We create a user mailtrain having all rights on a new database mailtrain.
MariaDB [(none)]> create database mailtrain;
Query OK, 1 row affected (0.00 sec)
MariaDB [(none)]> CREATE USER 'mailtrain' IDENTIFIED BY 'V3rYD1fF1cUlTP4sSW0rd!';
Query OK, 0 rows affected (0.01 sec)
MariaDB [(none)]> GRANT ALL PRIVILEGES ON mailtrain.* TO 'mailtrain'@localhost IDENTIFIED BY 'V3rYD1fF1cUlTP4sSW0rd!';
Query OK, 0 rows affected (0.00 sec)
MariaDB [(none)]> FLUSH PRIVILEGES;
Query OK, 0 rows affected (0.00 sec)
MariaDB [(none)]> show databases;
+--------------------+
| Database           |
+--------------------+
| information_schema |
| mailtrain          |
| mysql              |
| performance_schema |
+--------------------+
6 rows in set (0.00 sec)
MariaDB [(none)]> Bye
Configure your web server
I use Nginx and I’ll give you the complete setup for it, including generating Let’s Encrypt.
Configure Let’s Encrypt
You need to stop Nginx as root:
systemctl stop nginx
Then get the certificate only, I’ll give the Nginx Vhost configuration:
certbot certonly -d mailtrain.toto.com
Install Mailtrain
On your server create the following directory:
mkdir -p /var/www/
cd /var/www
wget https://github.com/Mailtrain-org/mailtrain/archive/refs/tags/v1.24.1.tar.gz
tar zxvf v1.24.1.tar.gz
Modify the file /var/www/mailtrain/config/production.toml to use the MySQL settings:
[mysql]
host="localhost"
user="mailtrain"
password="V3rYD1ff1culT!"
database="mailtrain"
Now launch the Mailtrain process in a screen:
screen
NODE_ENV=production npm start
Now Mailtrain is launched and should be running. Yeah I know it’s ugly to launch like this (root process in a screen, etc) you can improve security with the following commands:
groupadd mailtrain
useradd -g mailtrain
chown -R mailtrain:mailtrain /var/www/mailtrain
Now create the following file in /etc/systemd/system/mailtrain.service
[Unit]
 Description=mailtrain
 After=network.target

[Service]
 Type=simple
 User=mailtrain
 WorkingDirectory=/var/www/mailtrain/
 Environment="NODE_ENV=production"
 Environment="PORT=3000"
 ExecStart=/usr/bin/npm run start
 TimeoutSec=15
 Restart=always

[Install]
 WantedBy=multi-user.target
To register the following systemd unit and to launch the new Mailtrain daemon, use the following commands (do not forget to kill your screen session if you used it before):
systemctl daemon-reload
systemctl start mailtrain.service
Now Mailtrain is running under the classic user mailtrain of the mailtrain system group.
Configure the Nginx Vhost configuration for your domain
Here is my configuration for the Mailtrain Nginx Vhost:
map $http_upgrade $connection_upgrade {
  default upgrade;
  ''      close;
}

server {
  listen 80;
  listen [::]:80;
  server_name mailtrain.toto.com;
  return 301 https://$host$request_uri;
}

server {
  listen 443 ssl;
  listen [::]:443 ssl;
  server_name mailtrain.toto.com;

  access_log /var/log/nginx/mailtrain.toto.com.access.log;
  error_log /var/log/nginx/mailtrain.toto.com.error.log;

  ssl_protocols TLSv1.2;
  ssl_ciphers EECDH+AESGCM:EECDH+AES;
  ssl_ecdh_curve prime256v1;
  ssl_prefer_server_ciphers on;
  ssl_session_cache shared:SSL:10m;

  ssl_certificate     /etc/letsencrypt/live/mailtrain.toto.com/fullchain.pem;
  ssl_certificate_key /etc/letsencrypt/live/mailtrain.toto.com/privkey.pem;

  keepalive_timeout    70;
  sendfile             on;
  client_max_body_size 0;

  root /var/www/mailtrain;

  location ~ /\.well-known\/acme-challenge {
    allow all;
  }

  gzip on;
  gzip_disable "msie6";
  gzip_vary on;
  gzip_proxied any;
  gzip_comp_level 6;
  gzip_buffers 16 8k;
  gzip_http_version 1.1;
  gzip_types text/plain text/css application/json application/javascript text/xml application/xml application/xml+rss text/javascript;

  add_header Strict-Transport-Security "max-age=31536000";

  location / {
    try_files $uri @proxy;
  }

  location @proxy {
    proxy_set_header Host $host;
    proxy_set_header X-Real-IP $remote_addr;
    proxy_set_header X-Forwarded-For $proxy_add_x_forwarded_for;
    proxy_set_header X-Forwarded-Proto https;
    proxy_pass http://127.0.0.1:3000;

  }
}
Now Nginx is ready. Just start it:
systemctl start nginx
This Nginx vhost will redirect all http requests coming to the Mailtrain process running on the 3000 port. Now it’s time to setup Mailtrain!
Setup Mailtrain
You should be able to access your Mailtrain at https://mailtrain.toto.com
Mailtrain is quite simple to configure, Here is my mailer setup. Mailtrain just forwards emails to AWS SES. We only have to plug Mailtrain to AWS SES.
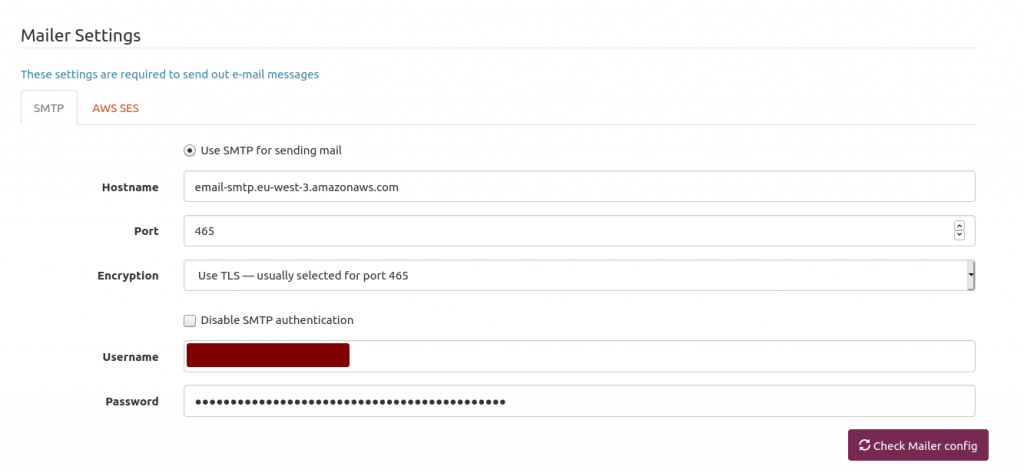
The hostname is provided by AWS SES in the STMP Settings section. Use the 465 port and USE TLS option. Next is providing your AWS SES username and password you generated above and stored somewhere on your computer.
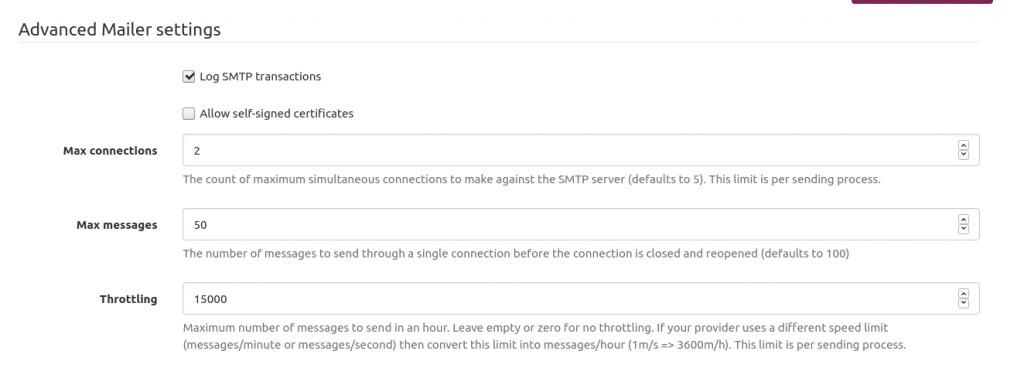
One of the issues I encountered is the AWS SES rate limit. Send too many emails too fast will get you flagged as a spammer.
So I had to throttle Mailtrain. Because I’m a lazy man, I asked Pierre-Gilles Leymarie his setup. Quite easier than determining myself the good one. Here is my setup. Works fine for my soon-to-be 4k subscribers. The idea is: if your AWS SES lets you know you send too fast then… just slow down.
Conclusion
That’s it! You’re ready! Almost. You need an HTML template for your newsletter and a list of subscribers. Buf if you’re not new in the newsletter field, fleeing Mailchimp because of their expensive prices, you should have them both already.
After sending almost ten issues with this setup, I’m really happy with it. Open/click rates are the same.
When leaving Mailchimp, do not leave any list of subscribers because they’ll charge you $8 for a 0 to 500 contacts, that’s crazy expensive!
Hey, that is for writing this post. Since you spoke about email templates, can I plug my own AWS SES templates browser and maker @ https://zeer0.com/templates?
it seems you can use a aws key in the mailer settings section, but maybe it’s just for sending the email. I’m not too sure abotu this part.